Showing posts with label Tutorials. Show all posts

Friday, 20 May 2016

The Ultimate, In-Depth, Step-By-Step Guide To Creating Your First Typeform Survey


Surveying your audience is without a doubt one of the best things you can do for yourself and your blog or business, and of all the survey creating options out there, Typeform is most definitely the most functional, easy the understand and attractive of the bunch. I talked a little about Typeform when I shared some reasons behind surveying your audience and how it can be of help, but being recommended something by someone isn't always a big enough push.

Naturally, trying something new is daunting, and when you don't understand the system, you're likely to abandon the thought, so today, as promised, I'm sharing an in-depth tutorial of Typeform, everything from building and designing your first custom typeform, to how to configure it and analyze all the data you'll receive once it goes live. Complete with screenshots and tips and tricks, you'll be creating surveys in your sleep that your surveyees (yes, that is a word believe it or not!) with be dying to take.

Now it's worth noting that you will need to set up an account at some point during the process, so it's probably much easier to get it out the way before anything else is done. As soon as you've sorted that out - and it shouldn't take all that long - we can get started. It's also worth mentioning that you'll be given the opportunity to watch numerous different walkthroughs throughout your first time, so don't worry if it all looks a little alien, with my help and Typeforms, you'll be survey royalty in no time.


There are two choices when it comes to creating a survey; you can use a ready made template that Typeform provides based on different types of forms, such as customer service feedback, or contact forms, and these forms are great for certain specific cases, however, I recommend you start with a complete blank slate which allows you choose the options that suit you and your needs. I'll be using the custom option during this tutorial, and sharing a quick run down of Typeforms features and options, how to design your survey and how to share it. Let's get started.

Saturday, 14 May 2016

How To Customise Simple Blogger Page Tabs


Learning HTML and CSS can be quite the headache. I know it, I've done it. Alas, it doesn't have to be so, learning how to code can actually be a walk in the park when you know what the heck it is you're actually reading and writing. Through the Basic Blogspot CSS series, I'll be taking you through the code behind your blog, from top to bottom, and how to customise the heck out of some of the most important aspects of your design. Today, I'll be teaching you the code behind your page tabs and the different ways you can style them.

Getting To Grips With Blogspot Page Tabs


Blogspot already has some customising options when it comes to your tabs. You can easily change the tabs text style and colour, and the background and separator colours, but aside from that, the options are limited, and limitations are not good. You need to kick those limitations out the door and get to grips with some actual code if you're going to create something awesome. So, what code is worth knowing concerning your tabs?

Friday, 6 May 2016

How To Find Time Restricted Tutorials With Search Tools

Don't waste time sifting through irrelevant tutorials to find the most up-to-date, most helpful for your problem, use Google Search Tools to make your search quicker, easier and much more precise. Click through to find out how.

Whenever I'm searching for tutorials online, the first thing I do is check is the date in which the tutorial was posted. There's nothing worse than finding what looks like an AWESOME tutorial, only to find it's from 3 years ago and hasn't been updated, rendering it, and your time, a waste. That post may have quality, top-notch content, and as far as Google and SEO is concerned, it answers your question, but if it's not up-to-date, then it's no good for you. It's one of the big reason you should always revamp your content for new readers - you never know when somebody will stumble across your content.

So, how do you find the most up to date tutorials that will give you the answers you need now rather than years ago? You can do it with the help of Google Search Tools. These tools allow you to specify the type of search you want Google to do. For example, you could specify for Google to search for results in a certain country, or a specific type of image on Google Images, but in our case, you can specify the time or dates you want Google to search within, a criteria you could say, to find you the most up-to-date, reliable source of information or tutorial you can find. Today, I'm showing you how.

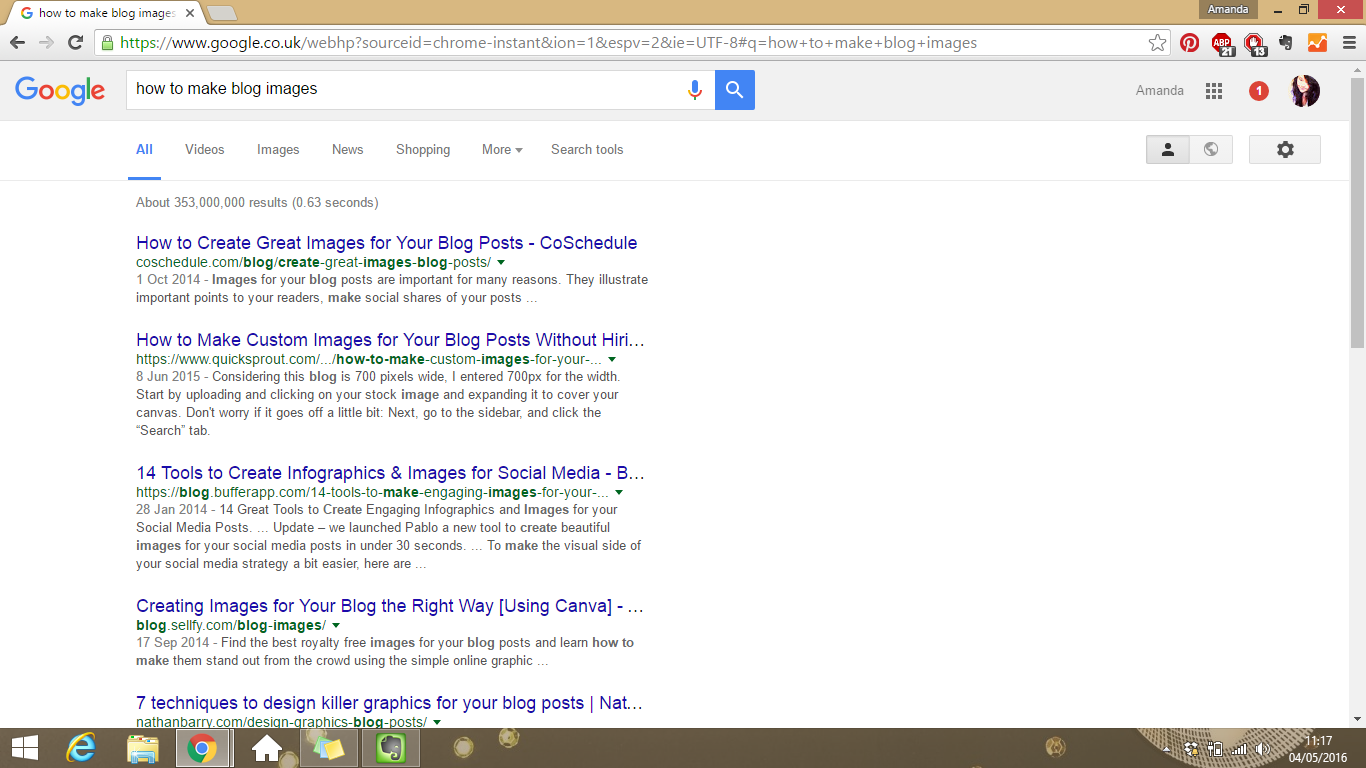
No matter how you search Google, Search Tools is always available.


Search tools essentially allows you to narrow down your search in order to find the best choices within a set criteria. In our case, we're looking for a tutorial on how to make a blog images, one of the most common searches for newbie bloggers out there given how important visuals have become. You can see that there are a variety of options, varying from 2014-2015.

Psst, check out how I make my blog graphics..

For somebody starting out in 2016, a tutorial from a few years ago might not be up their alley, after all, times have changed, as have trends and styles, so something a little more up-to-date is more their thing. We're going to narrow down Google's Search Results to only show tutorials within the last year.

Sunday, 13 March 2016

My Quick and Easy 5-Step Process To Editing Photos (With Picmonkey!)


Some say a good photo doesn't need editing, it's perfect as it is, and sometimes, I'll humour that idea. I've seen article after article after article that says unedited photos tend to gain the most likes, the most comments, the most interaction on social media, and especially on Instagram, however, what those articles don't take into consideration is that many users are now editing their photos before the image even hits the Instagram scene. When those articles say that unedited photos get the biscuit, there's a very likely chance that those photos are still being edited. A touch of brightness, a sharpening of look, it's been poked with the editing stick somehow, and mine are no different.

I've developed a step-by-step system that I use to edit my photos every single time. Every photo is edited in the same way, with slight variations on the actual depth of each poke, but generally, every photo is edited with the same method, which means that although I don't have a theme for my Instagram feed, they have a universal look and feel. Today I'm sharing my process, and the quick and easy steps I use to achieve bright and vibrant photos that stand out with happiness. Oh, and it's done with Picmonkey, but what do I do that isn't these days? I'M OBSESSED. *cough*

Saturday, 27 February 2016

10 Colour Palettes Inspired By Young Adult Book Covers (+ How To Create One in Picmonkey!)


Colours are vital when it comes to designing, well, anything and everything. Different colours affect people in different ways, as does their shades and tones, it's all about colour psychology, and what emotions or messages those colours evoke. Take Nellie for example. Grey is quite a calm colour, that gives on the impression of composure and relief, but it can also be an emotionless colour, and doesn't tend to stimulate excitement or energy. Sure, the colour represents me in a huge way, but it can put people off.

If you're not confident in your colour scheme, you're never going to be comfortable.

I've read quite a few interesting posts in finding the right colour scheme or palette for you and your blog/business, and it feels as though everybody and their uncle is creating Pinterest boards for absolutely everything, but for me, I find book covers inspiring in terms of colour schemes and moods. The right colours partnered together can stimulate a whole collection of emotions and feelings, either pulling me towards or pushing me away from picking it up, and rightly so, that's what colour does.

I've put together 10 different colour schemes, all inspired by, or based on book covers, each with their hex colour codes so you can start to create amazing things with those you most like, and at the end, I'll be showing you how to create your own, so stay tuned for that.

Wednesday, 3 February 2016

Google Analytic Features Made Easy For Beginners

Are you a Google Analytics newbie? Do those numbers scary the heck out of you? Here's some of the more common features made simple for you!

I talk about Google Analytics quite a lot on Nellie and Co. I use it quite passionately in terms of tracking my blogs statistics, on checking out which posts get the most viewing, how well my social media marketing is working and so much more, but for beginners, it's much more difficult to traverse the program, especially when you have no idea where to start.

As a beginner, Google Analytics was, in one word, scary. So many options, so much information, what the heck is a bounce rate?! It's all a little overwhelming, and if you don't where to start, you can either end up with a program installed on your blog that you don't really know how to use, or really be missing out on some sweet information on your blog while you look sorrowfully at your pageviews. To make things that little bit easier for GA beginners, I've put together this super simple tutorial featuring the basic uses for the program so you can make the most of your blogs statistics and finally understand what all those numbers actually mean.

Hold on, why do I need Google Analytics? Aren't my blog stats enough?


Um, no, I'm afraid your blog stats aren't enough, at least, not you're serious about keeping a close eye on your blog and, you know, actually getting yourself some growth beans. Trust me, as a Blogspot user, I learnt the hard way when I cracked the reason you shouldn't rely on blogspot stats, and using Google Analytics was a HUGE game changer for me. Personally, I can't comment on Wordpress either, but from experience with other bloggers I know and trust, almost every single one of them has GA in their backpack. Google Analytics can give you some of the best, most in depth information about your blog, information you never in your wildest dreams expected to have. Yes, you need GA, and no, your blog stats are not enough. Sorry..

Friday, 27 November 2015

How I Use Labels in Gmail To Organise My Inbox


I don't know about you, but I can get anywhere from 10 to 30 emails a day, and that's my email that deals with everything blog related. Whether it be newsletters I'm signed up to, ecourses I find myself enrolled on, emails to say I've recieved blog comments, or just plain old actual emails concerning Nellie and Co, it can get cramped and full pretty quickly. I managed quite easily with a messy inbox for quite some time, but it's when I started enrolling on free ecourses that it became too much to bare.

By not having an organised inbox, I couldn't find emails when I needed them most.

I knew from that point onwards I had to create some sort of organised system which would not only help me located my ecourses, and remember who the heck was the brains behind them, but also organised almost everything else that came in for future reference. Low and behold, Gmail gave me a gift in the form of labels, and my inbox hasn't been the same since.

Woah there Amanda, Gmail has labels?

Why yes, yes it does. Gmail, like everything else, likes it when you keep yourself organised, and it's nice enough to offer a helping hand in the form of labels. Labels allow you to tag something under a subject, or many subjects, or nest it under a category, so you can create a collection of somethings.

Labels allow you to organise, and colour code your inbox so you can, once you've labelled them, refer back to something easily, locate something with much more ease, or simply have everything under one subject in front of you at the touch of a button. Labels have 100% helped me clean up, organise and make my inbox a happier place, and here's how.

Friday, 16 October 2015

How I Use Buffer and a Two-Step Process To Become a Scheduling Star

Scheduling posts can be a chore, so do yourself a favour and check out Buffer, a fantastic social media scheduling tool that allows you to prepare and plan your social media updates.

I was asked a week or two ago how I manage to stay organised and schedule posts and updates for my blog. Staying organised and creating content for my blog is a post for another day, but scheduling updates on social media is definitely a topic for today. No, I'm not going to talk about how you should be everywhere all the time - you can't be, nobody is online all day, every day, but you can give the impression of being extremely organised, even when you're not. Here's my secret behind becoming a social media schedule superwoman.

I created a publishing schedule


When I first started blogging, I would think of my content, write it, and publish it, all within one day, and then save the next post for whenever my next bout of creativity hit. I had posts five days in a row, and then nothing for two weeks, and that was a baaaaaaad idea. The moment I started creating a publishing schedule was the best moment of my blogging so far.

Monday, 14 September 2015

How I Create My Blog's Graphics | Part Two: Canva

Canva is a great free blog image program, with its templates, easy interface, and oh, did I say free? Check it out!

A few weeks ago, I shared why graphics are really rather important when it comes to your blogs look and it's brand, and dished the dirt on how I create some of my graphics with Picmonkey, with a promise to share how I create my other graphics, those created on Canva. This is that promise my friends, and you definitely do not want to miss it. If you thought how I created my Picmonkey graphics was easy, wait until you check out Canva..

So, What's the Deal With Canva?


Well, much like Picmonkey, Canva is a free design resource, with the ability to buy extra features, but there is where the similarities tend to end. Unlike Picmonkey, Canva has over 40 different types of template size, all for different purposes, anything from the perfectly size Twitter Header, to Menu templates, to Blog Graphics (I know!). Within those different options, there are what feels like a never ending collection of actual design templates for you to try out and play around it, (although it's worth baring in mind that not all of those templates are free to use, so do be careful). You can choose from close to 1,000,000 (yes, a million people, it's worth counting the zeroes just to check) images and over 1000 different fonts, with clip art, icons, vectors and more available just be searching for it. Drag and drop, edit and upload, Canva is fabulous. Here's how I use it.

Friday, 21 August 2015

How To Retrieve Lost Custom CSS on Blogger/Blogspot


A few days ago, the lovely Ella from Once Upon a Bookish Time contacted me in regards to an issue with her Blogger CSS. The problem? It had gone poof. Completely vanished from her CSS area of Blogger design, and yet, her blog hadn't changed in its look, it had just gone for a wander and never returned. Understandably, Ella was pretty concerned as to a) where the heck her CSS had vanished to, b) why it had vanished in the first place, and c) how she'd get her CSS back without having to go hunting for it all again. Luckily, I had the answer.

Once the problem was solved, I realised the other way I knew of my method was because it has happened to me, and therefore the chances are, other Blogger users had suffered the same fate, and may or may not have been as lucky as myself and Ella where to rescue and reinstate our custom CSS. With permission from Ella, I've decided the share my method of retrieving lost CSS in the hope of helping others too.

First Things First, Back Up Your Template!


You may have lost your CSS in the Advance area option of your design, but I promise you, as long as your blog looks no different, your CSS coding is still easily retrievable, therefore backing up your template is a big must. In fact, it's a great habit to get into backing up your template before making any major changes to your design, or better still, keeping a copy of your HTML code in word document instead of or as well as so you're super duper safe your blog isn't going anywhere.

Wednesday, 12 August 2015

How I Create My Blog Graphics | Part One: Picmonkey

Starting out blogging, I was under the impression it was all about the content, and sure, content is key, it's one of the most common and popular phrases available to man, but 2 years down the line, like other things in life, blogging, and what works best when it comes to marketing and promoting, has changed. You can create some of the best content possible, you could have all the facts, all the figures, all the opinions, and lets face it, all the followers possible, but without something visual, you're lagging behind, and that's never a good thing.

Create something visual on your blog post is a sure fire way to get your post gaining more views. You might be ready to read for the long haul, but 90% of information transmitted is visual, and it's processed 60,000 times quicker than text. 40% of people respond better to visual images, and over 45% of people say design plays a huge part in the credibility of brands - all more than good enough reasons to consider using visuals in some way or another on your blog. Not only that, visuals are much easier and much more likely to be shared on social media, and with an accompanying image, your post can go from cold to behold.

So why do so many bloggers not use graphics?


They don't know how to. They don't know which programs to use, or better still, they've been brainwashed into thinking the only way to create great looking visuals is through Adobe, and sure, I can't speak for Adobe, I can't afford it and therefore can't use it, (Lauren at Elle and Company has a lot of tutorials for people more interest in the 'professional' graphics route) but there are so many other great options available for bloggers lacking design experience. Even better, there are programs available online, completely free, and I'm a passionate believer in getting what you can for free before going all out.

Photoshop? Gimp? Bah, here's how I create my blog graphics, completely free, with Picmonkey

I use two free image related programs: Picmonkey and Canva


Today, I want to focus on how I use Picmonkey to create my most commonly used graphics. Picmonkey is a free to use website that allows for collage creating, image editing and creating graphics for free, although for a monthly or annual fee, you can access further features such as extra fonts, better quality clip-art images and photo editing that enrich the users experience, although I personally know of a few loop holes to gain access to these free features in other third party ways, but that is for another day. For now, here's a behind the scenes look at how I created the accompanying graphic used in this post and other graphics you've seen of a similar style across Nellie and Co.

*This post does feature affiliate links for Picmonkey. Should you choose to purchase Royal Features using my links, I will receive a small commission. For more details, please consult my Privacy Policy.

Monday, 3 August 2015

How To Code Windows 8 Style Social Media Icons

Font Awesome is an online program that can be easily installed within your blog that allows you to use icons and brand logos as fonts, allowing for easy customisation, clearer, crisper social media icons for your blog, and lots of room for experimentation. During one of my many experiments with Font Awesome, I came across to ability to create social icons in the same style that you'd find on the Windows 8 interface, similar to 'Flat Design', a very popular trend in current blog design. If you're a fan of vivid, bright colours and like the idea of having Windows 8 Style Social Media Icons, then you've come to the right place.


First Step: Installation

Install is a scary word, but I can assure you, the process is really easy and really simple.
You're going to need to go into your blogs template and enter the following code just below the <head> tag.

<link rel="stylesheet" href="//maxcdn.bootstrapcdn.com/font-awesome/4.3.0/css/font-awesome.min.css" />

Be sure to click save, and the icons should become available to use afterwards.

Tuesday, 28 July 2015

How To Change Your Blog Post URL (Blogger Only)

SEO doesn't have to be hard, and you don't need an alternative to Yoast if you use Blogger either. Simply learn how to change your blog post url and make SEO work for you.

When writing and publishing a post on Blogger, the only options in the sidebar people tend to use often are 'labels' and 'schedule', and yet there is another important option just below those can help your blog just as much, if not more, and it's your 'Permalink' option, aka, what your post URL looks like in link form.

Currently, when creating any post, your permalink is created by using your title. As clever and handy as that is, if your title doesn't focus on the subject at hand, or isn't key word rich, you're not going to hitting up popularity in your search results, neither are you going to be showing people what the link they're actually following to your post is about; that's both bad form, bad for business and bad for your blog. Changing the URL of your blog post is actually really easy and simple, and is a habit you should get yourself into no matter where you blog. I'm going to show you how to change Blogger Post URL's today.