

I don't know about you, but I can get anywhere from 10 to 30 emails a day, and that's my email that deals with everything blog related. Whether it be newsletters I'm signed up to, ecourses I find myself enrolled on, emails to say I've recieved blog comments, or just plain old actual emails concerning Nellie and Co, it can get cramped and full pretty quickly. I managed quite easily with a messy inbox for quite some time, but it's when I started enrolling on free ecourses that it became too much to bare.
By not having an organised inbox, I couldn't find emails when I needed them most.
I knew from that point onwards I had to create some sort of organised system which would not only help me located my ecourses, and remember who the heck was the brains behind them, but also organised almost everything else that came in for future reference. Low and behold, Gmail gave me a gift in the form of labels, and my inbox hasn't been the same since.
Woah there Amanda, Gmail has labels?
Why yes, yes it does. Gmail, like everything else, likes it when you keep yourself organised, and it's nice enough to offer a helping hand in the form of labels. Labels allow you to tag something under a subject, or many subjects, or nest it under a category, so you can create a collection of somethings.
Labels allow you to organise, and colour code your inbox so you can, once you've labelled them, refer back to something easily, locate something with much more ease, or simply have everything under one subject in front of you at the touch of a button. Labels have 100% helped me clean up, organise and make my inbox a happier place, and here's how.
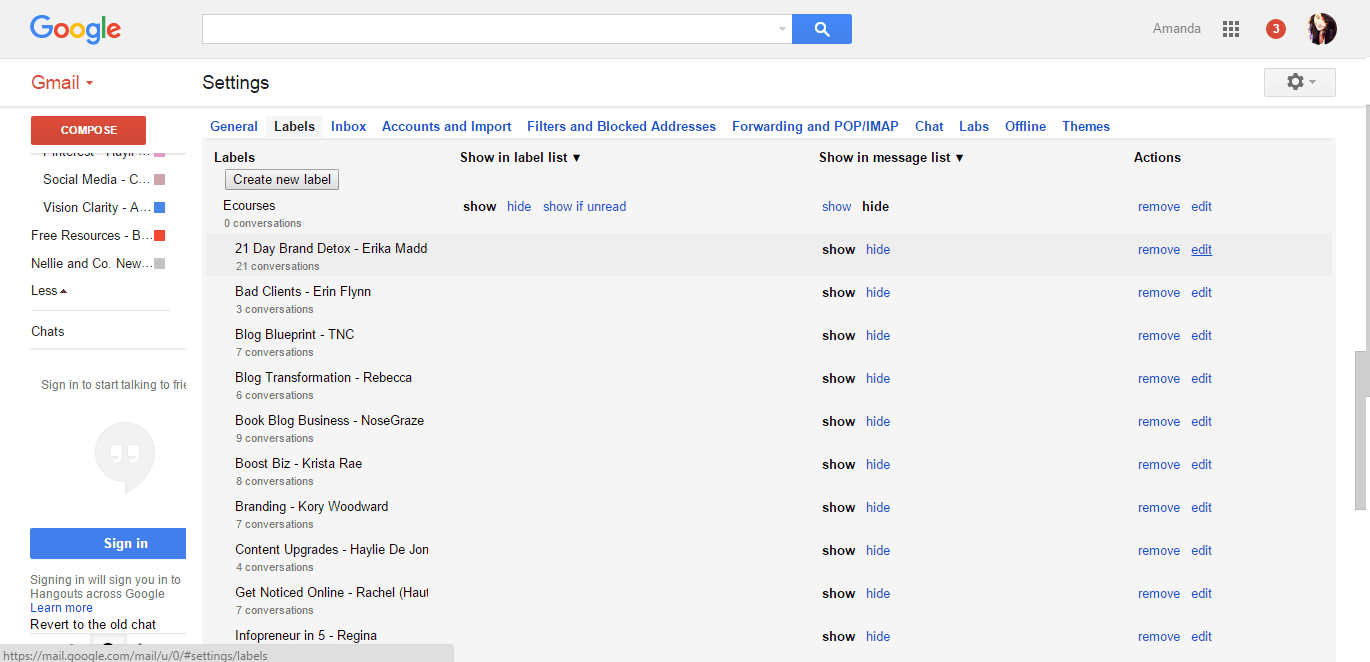
For starters, let's take a look at the main reason I wanted to get organised. Ecourses. I've already given you a quick look at some of the ecourses I've joined, but trust me, there have been so many more courses I've enrolled on and taken part in, and I plan on featuring them all at some point (I'm in the middle of putting together a follow-up with 7 more right now!), so organising those ecourses became key. Here's how I did it.
Looking at it from a desktop point of view, Gmail can be a little, bland, and disorganised. Do me a favour and open up your Gmail right now. It's either very white (you really should at least delete the emails you don't want to read, or unsubscribe from whoever sent them) or it's very grey (good on you for actually bothering to read your emails). It's far from exciting, or fun to look at, and I bet you you'd struggle to find something from 3 months back without clicking backwards in time or taking a lucky dip in the search bar, yes? That's where your labels come in.
Labelling things in Gmail helps create order and a system. It also makes things look damn pretty.
Let's take a look at my inbox for a second to give you a better idea.
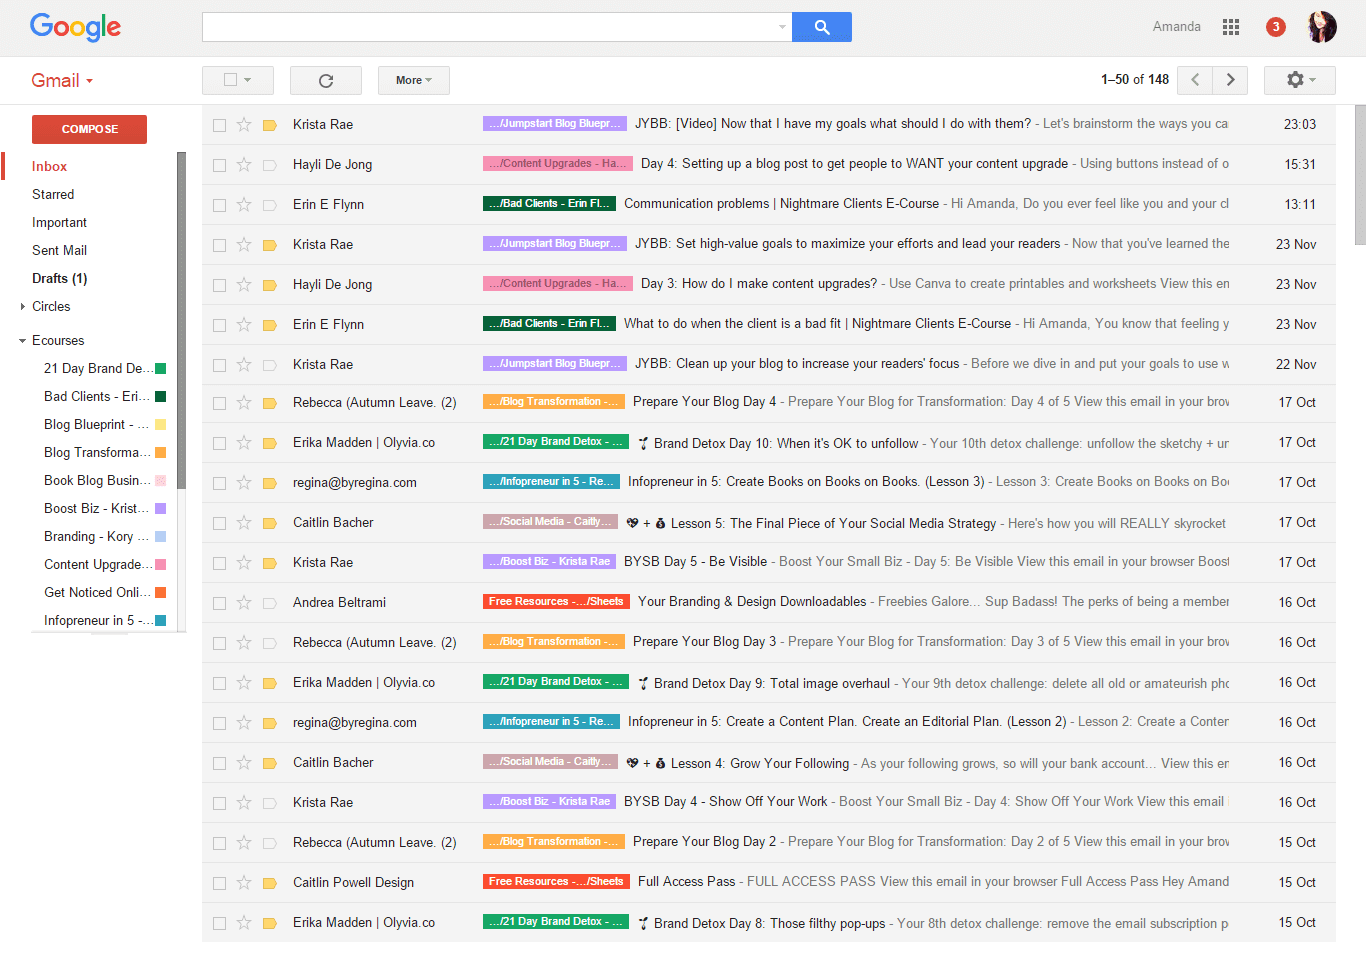
Now tell me that doesn't look like a place you'd like to explore for a short while?
Looking at the left sidebar, you can see just some of the ecourse labels that make my Gmail much more organised, and how they're all nested under Ecourses, just to make things so much easier. Now, let's try out the organised system in motion, shall we?
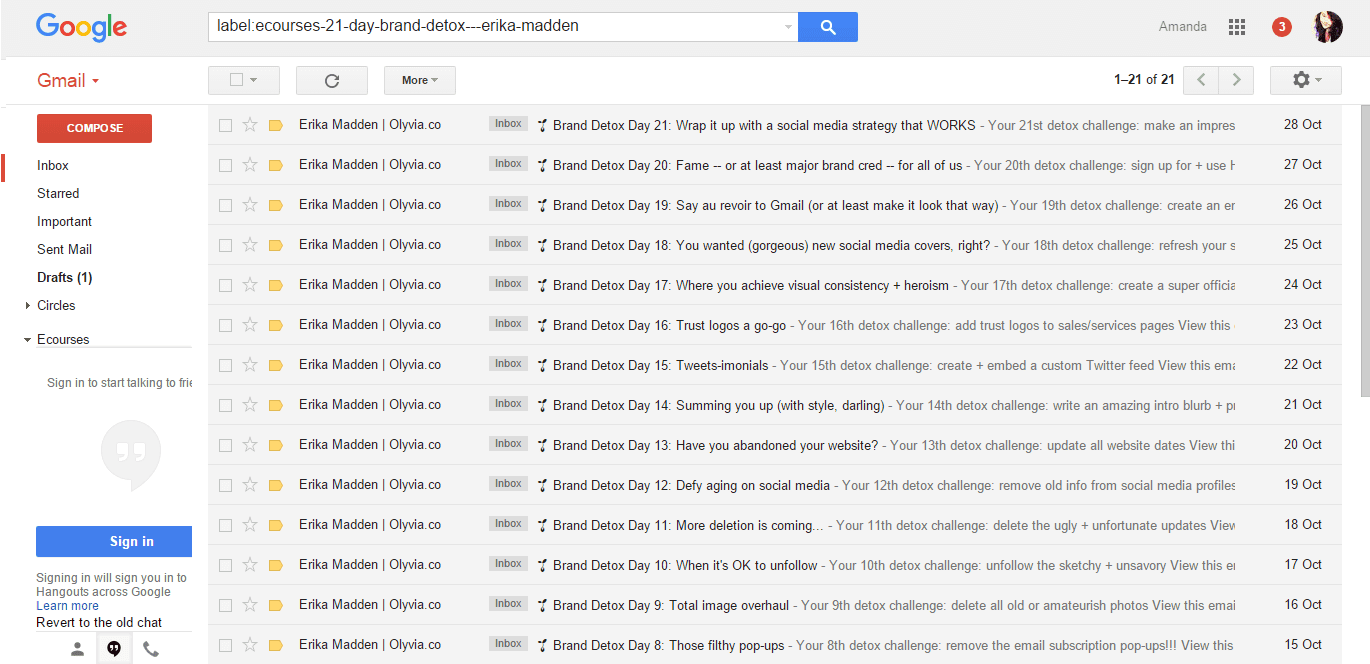
Say for example I wanted to check out and remind myself about Erika's 21 Day Brand Detox, I would hit my left sidebar, scroll down to Ecourses and click the little arrow on the left hand side of title and expand the labels. Then I'd click on Erika's ecourse, which just so happens to be at the top, and what do you know, every email she ever sent me in that course in there waiting for me to check out, at the drop of a hat. Also see how the search bar has the source and where the emails are located in my email? Pretty nifty, and very helpful.

How Can I Get Myself Some Of Those Pretty, Colourful, Organising Labels?
Easy as pie.
Choose an email you want to label, and click on the little box on the left hand side, before the star. With that email now chosen, take a look at the taskbar just above your emails, and you'll now see a little icon of a label, so click it. You'll be given a prompt to enter a label name, so just type in whatever title you want to give that label and click create. Tadah, your first label.
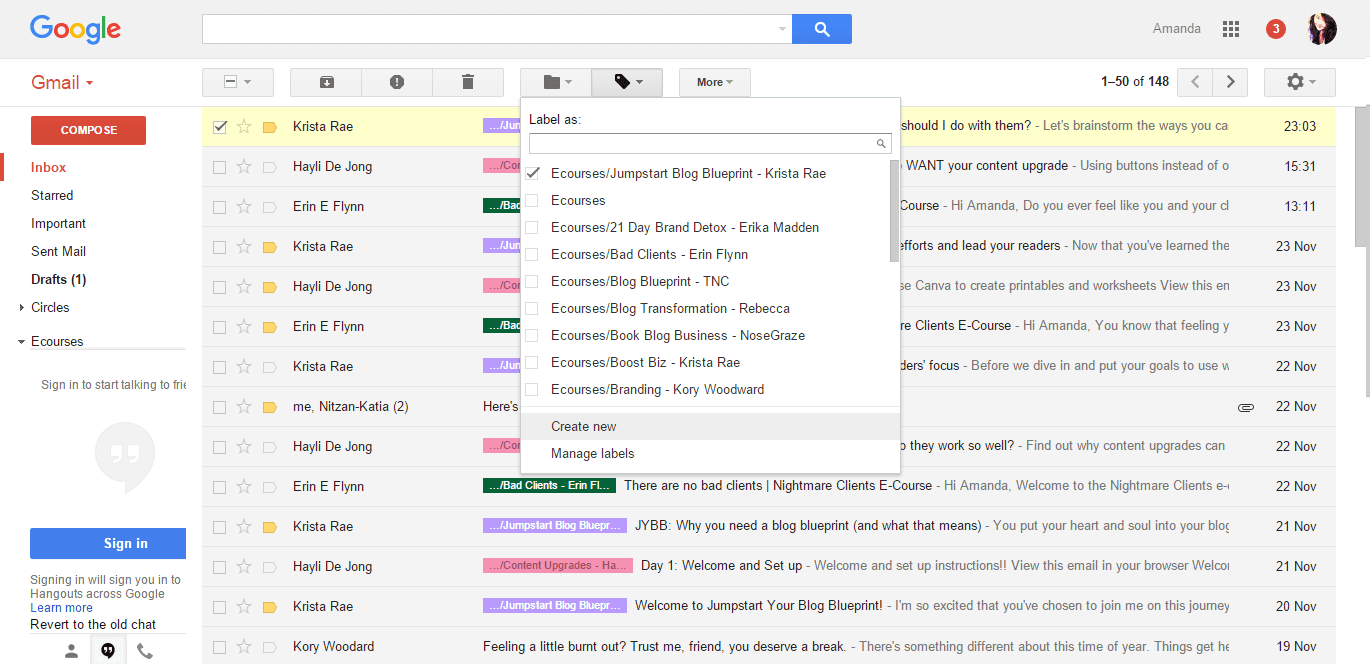
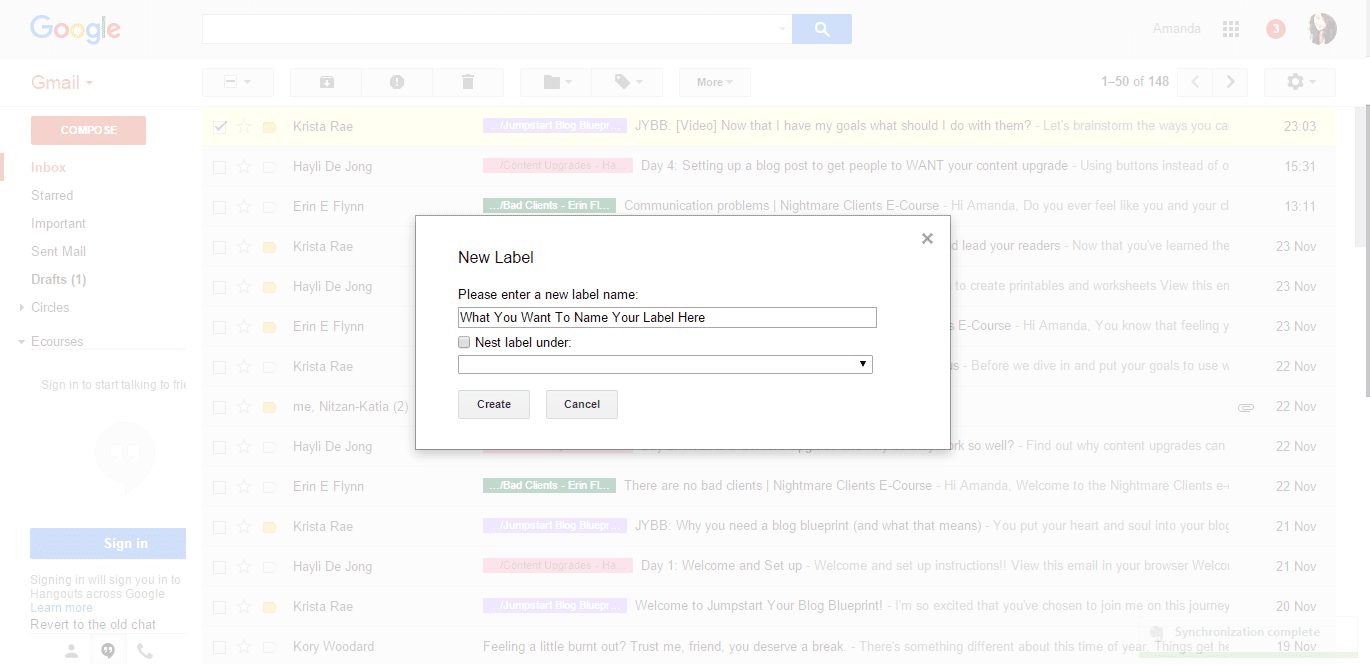
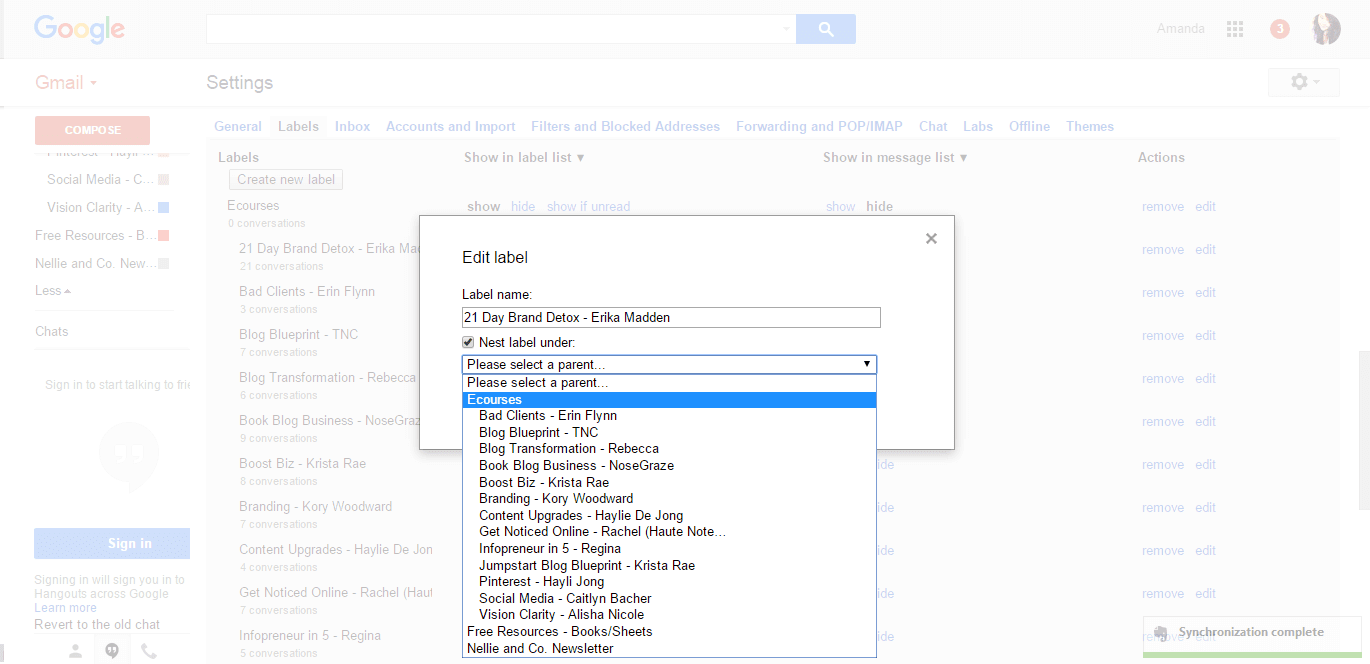
Now, if you want to get clever and nest multiple labels under one larger label, you need to create a new label first. In your left sidebar, scroll all the way down in your options, right down to the bottom, until you hit 'Create New Label'. Click it and follow the exact same thing you've just done, clicking create to save it. Now, just above the option to 'Create New Label', there's a second option to 'Manage Labels', so click on that next. You'll be hit by this screen, and don't panic, it's not as scary as it looks.
Scroll down to Labels and choose a label that you want to nest or put within another label. For example, I've highlighted Erika's 21 Day Detox again, and I currently have it under Ecourses, so that's what we're going to do now. Click the edit button on the far right of the label you want to nest under another, and you'll be shown a new prompt screen which looks a lot like the others previously. Where it says 'Nest label under', choose the label you want to nest it under, and click save. Now, when you look at your left sidebar, the original label can be found under the leading label, making your inbox just that little bit more organised.
But what about the colours?!
I hear you, we're getting to that now.
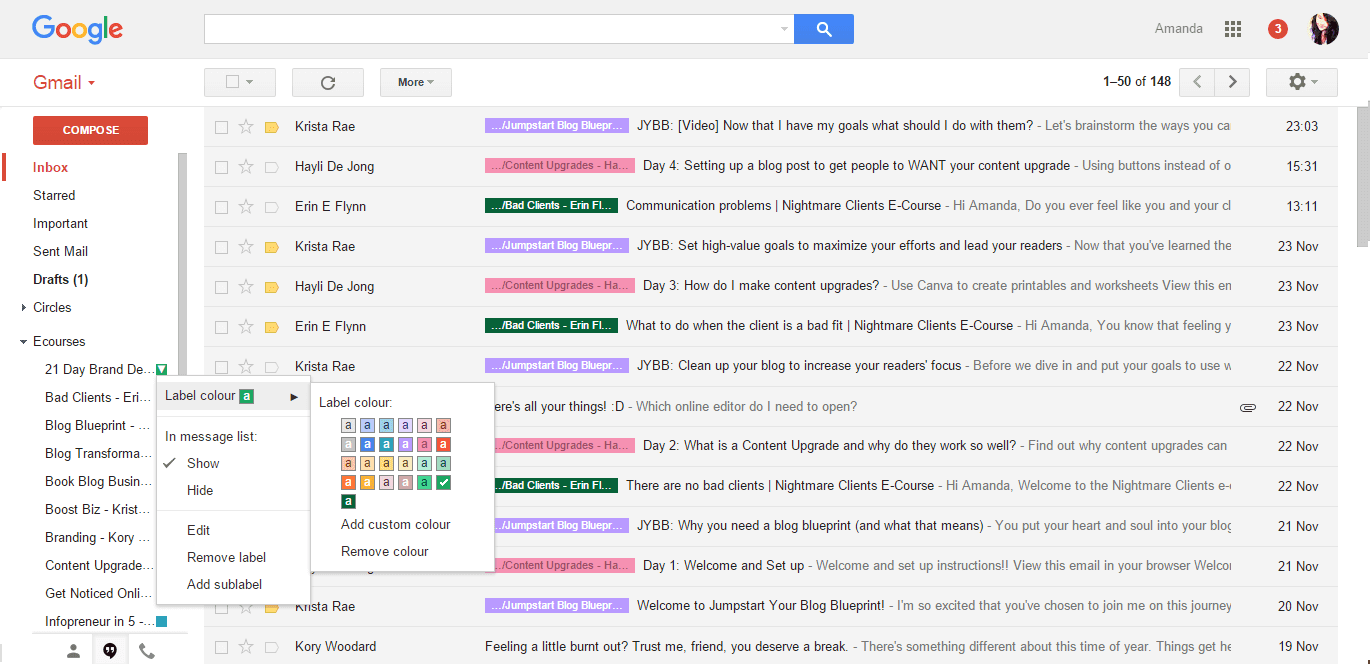
In your left sidebar, scroll down to the label you want to add a colour to, and click on the right hand-side arrow. This will bring a box down, giving you some options. Click over the first option, 'Label colour' and you'll be given a selection of colours to choose from. What colour you choose is up to you, but you create your own combination by choosing 'Add Custom Colour' and go from there.
Sadly, I'm yet to find a way for the emails I get coming in to come in already labelled, (that is something I'm still exploring at the moment) so you do have to label them yourself, but taking 5 minutes, if that, out of your day to keep your inbox organised for present you, and future you when you want to go looking for something is really not a bad price to pay.
I love using Gmail labels!!!!
ReplyDeleteNellie And Co.: How I Use Labels In Gmail To Organise My Inbox >>>>> Download Now
Delete>>>>> Download Full
Nellie And Co.: How I Use Labels In Gmail To Organise My Inbox >>>>> Download LINK
>>>>> Download Now
Nellie And Co.: How I Use Labels In Gmail To Organise My Inbox >>>>> Download Full
>>>>> Download LINK qK
Omg that is FABULOUS. I don't use labels really because I delete almost everything. *heavy sigh* It's the only way I can keep my inbox from freaking me out. XD So I read = delete. But I do love how pretty and coordinated and colourful yours looks. :') And I do love how gmail has sections too, so certain kinds of emails show up in like "updates" or "promotions" or whatever the sections are called. xD That is insanely helpful.
ReplyDeleteYou had me at color coding, I had NO idea Gmail could do this. I knew they had labels but I guess I was too lazy to try them out haha. I just have three folders and put things in there. Still, I do lose things and I think this would help me a lot!
ReplyDeleteYou follow Erika too? Of course you do XD I just recently stumbled onto her blog(from pinterest I //think//?) SHE'S AMAZING. I'm eating her blog posts so bad XD
ReplyDeleteNellie And Co.: How I Use Labels In Gmail To Organise My Inbox >>>>> Download Now
ReplyDelete>>>>> Download Full
Nellie And Co.: How I Use Labels In Gmail To Organise My Inbox >>>>> Download LINK
>>>>> Download Now
Nellie And Co.: How I Use Labels In Gmail To Organise My Inbox >>>>> Download Full
>>>>> Download LINK FD
Thaank you for being you
ReplyDelete