
Book and blog photography has quickly become one of my favourite side-projects, and with good reason - I'm actually really good at it. I love coming up with new and exciting prompts, new styles, new ways to show off my products and my collections, and it's almost impossible for me not to take a least one new photo every day. It's without a doubt a new favourite hobby, and worth getting out of bed to do, but my 'perfect photos' are sprinkled with lies, and by lies, I mean some sneaky little hacks.
Is it right to be 'hacking' my photo editing, to be creating the image of something that isn't there, or getting a quick fix from some sneaky lil' editing? Maybe not, but these little secrets have played a BIG part in my social media and blog growth, and have really delivered. Today, I wanted to share with you my favourite photo editing hacks, made possible with Picmonkey, so you can be lil' photo editing monsters with me.
1 | How To Bring a Broken Phone To Life
Frequent followers on Instagram will have seen both black and white samsung phones creeping into many of my photos, and with good reason. Not only is a phone a really good prop on it's own, but you can use it to provide more depth to the photo, like featuring your blog, or your current e-read. Here's the sneaky lil' lie..
Neither of these phones actually work, at least, not properly.
The black samsung phone does work, it's just really not all that good, but the white one does absolutely nadah. It's dead and buried and stone cold sober, and yet, my photography gives it life.
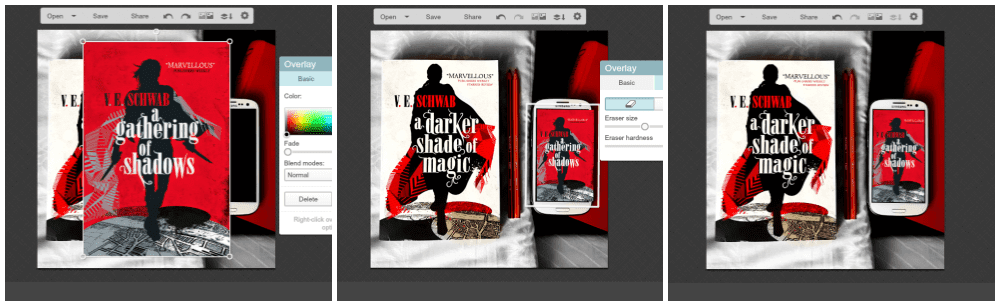
So, how do I do it? Simple, Picmonkey Overlays.
I've talked about overlays previously when I shared the secret behind my previous blog graphics, and by using the same method, I manage to bring both these phones to life, and give the impression they're in working order, when really, they're just chillin', and not at all as good as my photography would make you believe. It's a simple case of overlaying the image you want on top of your photo, tweaking what you need to, erasing what you don't need, and ensuring that you leave a small border between your overlay and where you phones screen meets the actual phone as to make it look a hell of a lot less fake. Like so:
2 | Turning One Photo Into Many With Turns & Angles
Without a doubt this is the simplest of of my hacks, and doesn't involve all that much hard work and time, as the assumption is that you're already snapping photos, so snapping a few more won't make much of a difference in the long run. Or will they? Let's have a think about something
When trying to take one photo, I can easily take between 10-25 depending on how badly my hands are shaking, or the set-up of the shoot, and most commonly, how much variety I want in my angles.
You can turn what could be a pretty bland photo into something simply amazing just by taking a photo from a different angle, or rotating one.
Don't believe me? Just take a look at these photos and see exactly how it works.
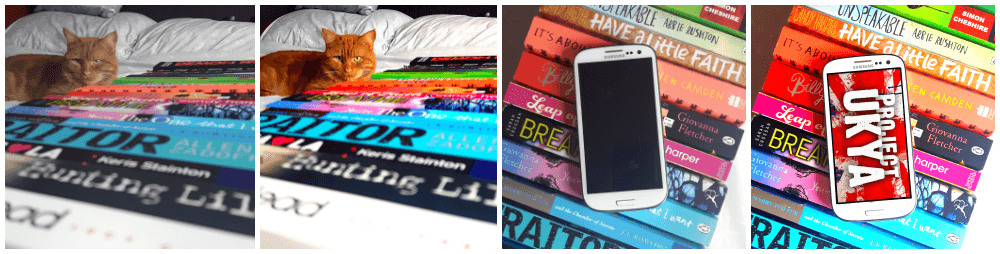
The image on the left is the original, while the image on the right is the edited version. In the first set, you can see how the line of books is identical in both images, and yet both photos not only look completely different, but at a first glance, you wouldn't instantly think they were taken in the same five minute session.
Taking multiple photos from numerous angles is also extremely helpful when you've nailed a pretty complicated set-up, because you naturally want to get the most out of it, but the trick is in making each photo look unique, creative and giving a new perspective on a simple set-up.

Let's look at the first photo in this collection. It's exactly the overall look I was aiming for, but for set-up that took me over 20 minutes to get just right, I wanted to get my time's worth, so continued to snap photos across the board. See how the images that follow all focus on a different perspective, on a different area of the original photo and bring something new each time? It's about turning one photo in many, and nailing it.
3 | How To Add Effects To Specific Areas of Photos
I talked a little about this trick when I shared how to I edit my photos, and it's definitely one of my favourite ways to edit a photo exactly how I like it. The trick involves applying special effects to your images, but erasing the effect away in areas you don't want it to be applied. You can also choose to only lightly apply affects in certain areas, as well as on the whole.
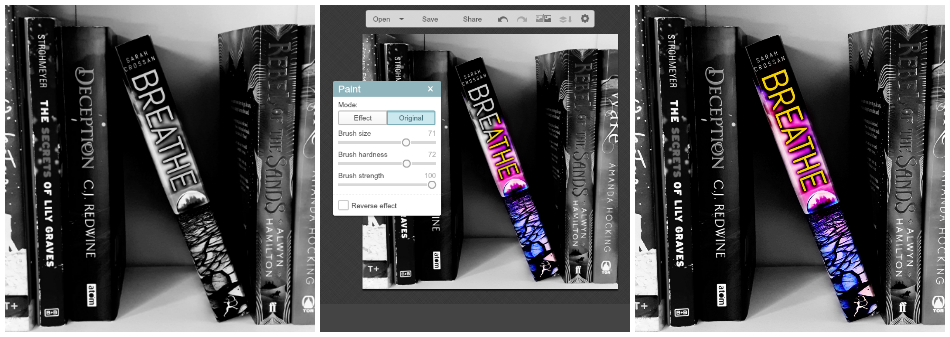
The effect works quite a lot like the first hack in that you erase what you want and keep what you don't, so for example, in this image, I wanted to keep Breathe coloured and the rest in black and white so it was the sole focus on the image. By erasing the black and white from Breathe, I achieved that.
You can also do this with effects like soften, by using the same method and erasing the areas you want to soften, but you can also create black into colour affects by changing the hardness of the effect brush, the fade setting and other aspects. You can really quickly and easily create the photo of your dreams by controlling the effect the extra effect you add has. World is your oyster baby.
These are probably the tricks I use most often within all my photography and editing, all of which you can check out on Instagram, and without a doubt they're the kind of tricks I like to see in other peoples photos too, so get creative, use these tricks and get outside of your editing box. Oh, and then point me in the direction of your edited photos so I can admire you're lil' cheeky handiwork using my favourite go-to ideas.
Saving this post! Have been contemplating starting a bookstagram for a while now - this post will come in handy when I do start one!
ReplyDeleteThis was so helpful especially the phone one!
ReplyDeleteI love the third one! I need to learn to do that!
ReplyDeleteYESSS I DO ALL OF THESE! *hi fives* Although I use my iPod for ebook photos, which does work fine, but I still overlay because I think it makes the cover crisper/clearer. And I'm all for that in my photos. 😂 And I LOVE the colour-accent affect! I don't do it as much anymore...but I did it this week with the Starflight cover. Because it has that trail of gold? and OMG I WAS SO PROUD OF HOW IT TURNED OUT. XD
ReplyDeleteAnd you are VERY good at this, I CONCUR! I love your instagram!!
Great tips! Thank you for sharing. I've always wanted to know how to do the first one. I cannot wait to play around with some new photos now.
ReplyDeleteCarrie @ Paper Bindings
Thank you for the tips! I've always wanted to know how to do the colour splash one! I think my problem is that I just take and then post - I think I need to get serious about taking photos and then editing them afterward!
ReplyDeleteI'm pretty sure this post has saved my instagram life. I want to get more into bookstagram but it seems like I keep using the same two angles and setup over and over again with the same filters. Thanks for sharing! :)
ReplyDeleteيجب أن يكون هذا أحد أكثر محتويات الويب ذكاءً التي صادفتها في الآونة الأخيرة. يتشابه الأسلوب والتسليم مع NCLEX CERTIFICATE FOR SALE ONLINE التي تغير حياة الناس في الوقت الحالي. سأضع إشارة مرجعية على هذا الرابط حتى أتمكن دائمًا من العودة لمزيد من المحتوى الإعلامي. تحياتي لكم جميعا وسنة جديدة سعيدة
ReplyDelete